Configure the Cisco PIX/ASA Firewall Integration Module
To configure:
- Select Cisco PIX/ASA Firewall Integration and then select Configure. The Select Appliances dialog box opens.
- Select the required Forescout devices and then select OK.
The Cisco PIX/ASA Firewall Integration Module Configuration window opens.
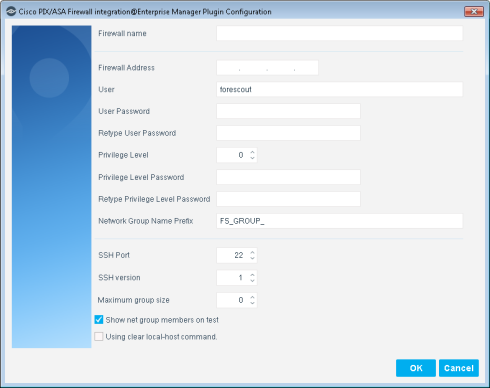
Define the following Cisco PIX/ASA Firewall Integration fields:
Firewall nameThe name of the PIX or ASA firewallFirewall AddressThe IP address of the PIX or ASA firewallUserThe Forescout device SSH user nameUser PasswordThe Forescout device SSH user passwordPrivilege LevelThe Forescout device user privilege levelPrivilege Level PasswordThe password to obtain the privilege levelNetwork Group Name PrefixA label that identifies network object groups used by Forescout eyeSight. This prefix is combined with a numerical value to specify an object group. Together, the prefix and suffix define a set of object groups. See Apply Firewall Access Lists to a Host for more information.SSH PortThe port number for secure shell communication.SSH versionThe version of SSH used to access the PIX or ASA firewallMaximum group sizeThe maximum size of a network object groupShow net group members on testSpecifies whether to list the members of the network object group when you test the module.Using clear local-host commandSpecifies whether to run theclear local-hostcommand at the firewall after a host is added to or removed from a network group. This command clears all existing connections and NAT sessions associated with the endpoint on its local network segment. - (Optional) Repeat the steps above to configure communication between remaining Forescout devices and additional PIX/ASA firewalls.
 minute read