About Windows Vulnerability DB Module
The Windows Vulnerability DB delivers vulnerability updates to the Forescout eyeSight soon after they are released from Microsoft. These updates are used when working with vulnerability policies. Sources and settings for Windows Updates are configured in the Host Property Scanner (HPS) Inspection Engine.
The HPS Inspection Engine, installed on each Appliance, instructs endpoints to download the information from the Windows Vulnerability DB when the Microsoft Vulnerabilities or the Microsoft Vulnerabilities fine-tuned property is used. SecureConnector is not required to download or work with Windows Vulnerability DB information on endpoints.
Microsoft Vulnerabilities Properties
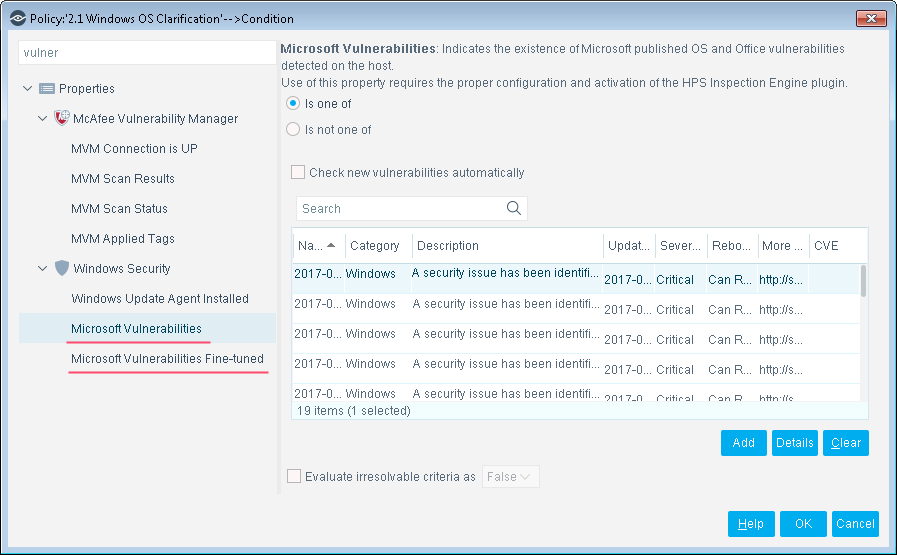
Vulnerability Detections
Vulnerability detections appear in the Console Details pane when you select the policy used to detect vulnerabilities.
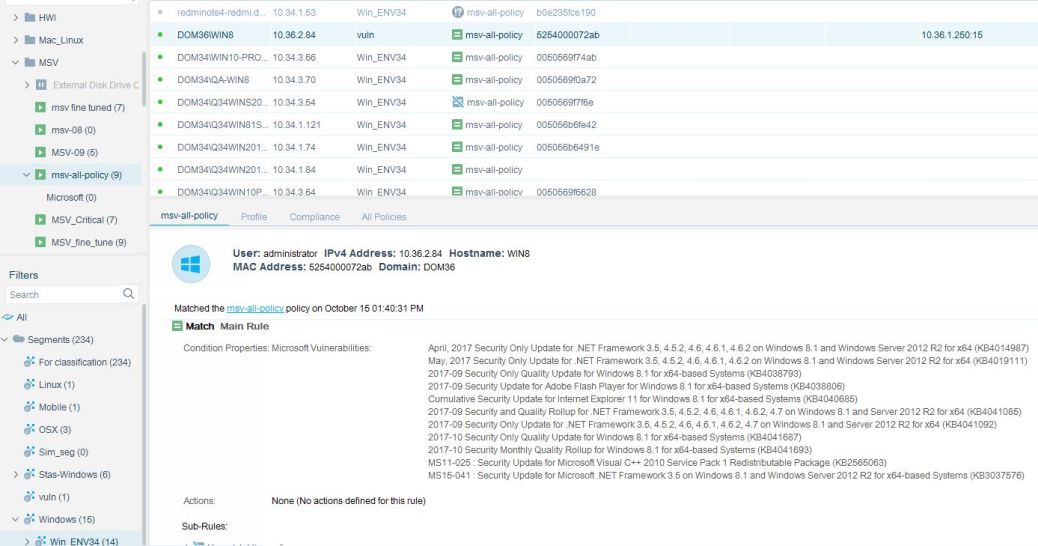
Supported Windows Operating Systems and Other Products
For information about the vendor models (hardware/software) and versions (product/OS) that are validated for integration with this Forescout component, refer to the Forescout Compatibility Matrix.
Changes that Impact Windows Endpoints
-
After installation of the Windows Vulnerability DB, the HPS Inspection Engine is restarted.
-
The plugin installs the following file(s) on endpoints.
| Name | Description | Last Updated |
|---|---|---|
|
fs_wua_search.vbs |
Resolves Microsoft Vulnerabilities properties. |
Release 17.0.7 |
Distributing Vulnerability Information to Windows Endpoints
There are situations when it is more efficient for endpoints to retrieve vulnerability information from Windows Updates (WSUS), rather than use the information provided by the Windows Vulnerability DB.
It is recommended to continue using WSUS or Windows Update in the following situations:
-
When a local WSUS instance is deployed in your network environment.
-
When endpoints are connected to your network through a VPN and are physically located at a distance from the Appliance, it may be faster for the endpoint to retrieve vulnerability information directly from the Microsoft Updates website or a local WSUS.
When they are available, you may use other methods to distribute the Microsoft Vulnerability CAB file to endpoints in your environment.
The HPS Inspection Engine looks for the following file on Windows endpoints:
-
% systemroot %\temp\wsusscn2.cab
If this file is different from the CAB file provided by the Windows Vulnerability DB, the Forescout platform downloads its own CAB file to the endpoint.
Minimize Bandwidth during Vulnerability File Download
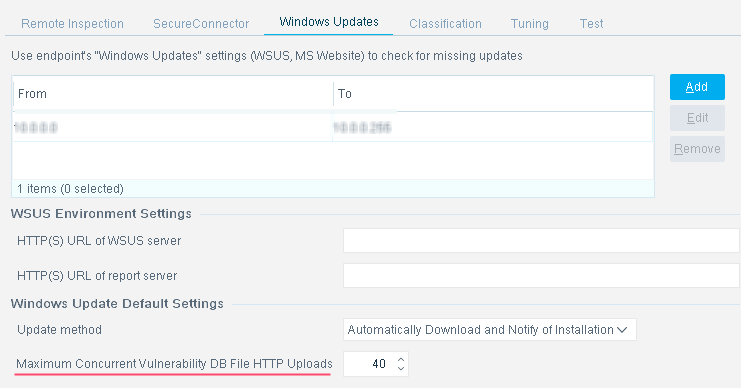
You can minimize bandwidth usage during Microsoft vulnerability file download by limiting the number of concurrent Hypertext Transfer Protocol (HTTP) downloads to endpoints. The default is 20 endpoints simultaneously.
To customize:
-
Select Tools > Options > HPS Inspection Engine > Windows Updates tab.
-
Define a value in the Maximum Concurrent Vulnerability DB File HTTP Uploads field.
Using Vulnerability Information to Manage Endpoints
To work with vulnerability information:
-
Create a policy based on the Windows Updates Compliance policy template. This policy uses the Microsoft Vulnerabilities property to check Windows endpoints for vulnerabilities related to all Knowledge Base issues downloaded from Microsoft. See Windows Update Compliance Template v2 for details.
-
Accept default scheduling/recheck behavior for the policy.
Vulnerability Reporting
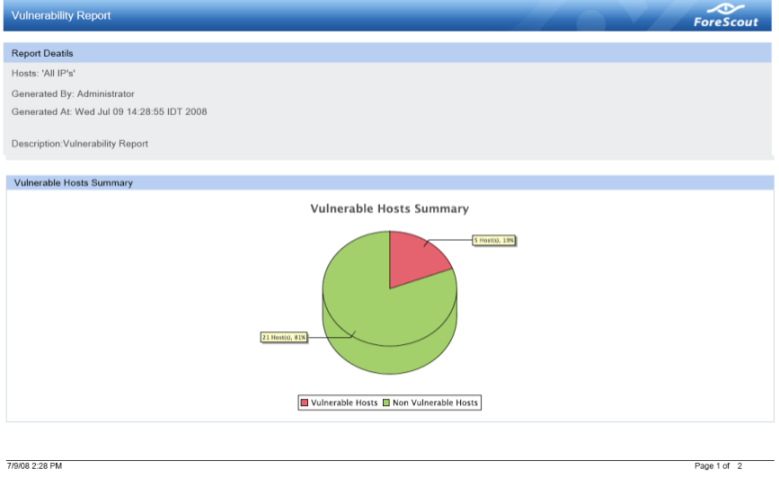
You can also generate reports that display the vulnerability status of selected Windows hosts. The report displays the number and percentage of hosts with vulnerabilities versus those that have no vulnerabilities and lists the relevant hosts.
To create a report based on vulnerability information:
-
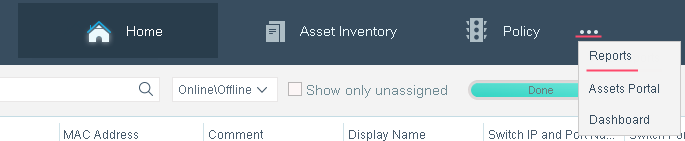
Select Reports by clicking on the ellipsis icon from the Forescout platform toolbar. The Reports portal opens.
-
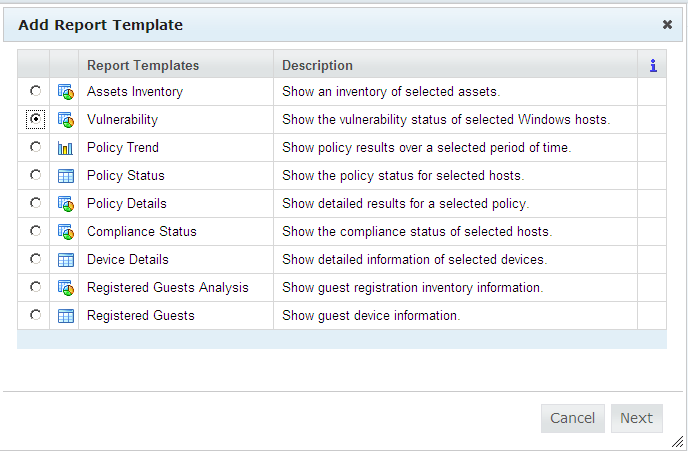
Select Add. The Add Report Template Wizard opens.
-
Select the Vulnerability Report Template.
-
Follow the wizard instructions to create the report.
Windows Update Compliance Template v2
This topic describes how to use the Windows Update Compliance Template v2 and describes the main rules and sub-rules of the policy.
About Forescout Policy Templates
Forescout templates help you quickly create important, widely used policies that easily control endpoints and can guide users to compliance.
Predefined actions – instructions regarding how to handle endpoints – are generally disabled by default when working with templates. You should only enable actions after testing and fine-tuning the policy.
The "Windows Update Compliance Template v2" template is available for detecting and managing endpoints.
About Windows Update Compliance Template v2
Use this policy to detect Windows endpoints that were not updated with the latest vulnerability patches published by Microsoft.
The policy places endpoints in the Windows Not Updated group. In addition, you can use optional remediation actions (disabled by default) to:
-
Install SecureConnector to manage Windows machines
-
Allow endpoint users to remediate vulnerabilities from the desktop
-
Allow automatic remediation of vulnerabilities
This policy applies to Windows endpoints only.
How Endpoints are Detected and Handled - Main Rule and Sub-rules
This section describes the main rule and sub-rules of the policy created by this template. Policy rules instruct the Forescout platform how to detect and handle endpoints defined in the policy scope.
Endpoints that match the Main Rule are passed to sub-rules for detailed inspection and handling. Endpoints that do not match the Main Rule are not inspected by sub-rules of the policy.
Sub-rules are evaluated in the order in which they appear until an endpoint matches the condition of a rule. When a match is found, the corresponding action is applied to the endpoint. Only if the endpoint does not match the condition of the sub-rule, it is inspected by the next rule.
Typically, Main Rule and Sub-rules form an automated sequence that qualifies endpoints, and then applies different detection and handling scenarios.
Windows Update Compliance Template v2 Main Rule and Sub-rules
Main Rule
The main rule of this policy filters for Windows endpoints. Only Windows endpoints are passed on to evaluation by sub-rules.
Sub-rules
The policy template provides the following sub-rules:
-
Not Corporate Hosts: This rule matches endpoints that are not in the Corporate Hosts group. No action is applied. This rule matches non-corporate endpoints and excludes them from further policy evaluation.
If your environment does not use Corporate/Guest user management features, disable this rule.
-
Not Manageable: This rule matches endpoints that are not manageable using Remote Inspection or SecureConnector. This prevents further evaluation of Windows vulnerabilities on the endpoint. Policy evaluation ends for these endpoints.
The optional Start SecureConnector action installs SecureConnector, making the Windows machine manageable by the Forescout platform. This action is disabled by default.
-
Windows Updates Unavailable: This rule matches endpoints that run versions of Windows for which updates are no longer published.
The Add to Group action assigns these endpoints to the Windows Not Updated group.
An optional HTTP Notification action redirects these endpoints to a web page with a customizable message. This action is disabled by default.
-
Waiting for Reboot: This rule matches endpoints on which updates were successfully installed. The Forescout eyeSight is now waiting for the endpoint to reboot to complete the update process. No action is applied.
-
Windows Updates Required (Custom): Use this rule to match endpoints that are exposed to one or more specific published vulnerabilities. In the rule condition, customize the selected items in the Microsoft Vulnerabilities property to detect endpoints with the vulnerabilities that interest you.
-
Windows Updates Required (Critical): Use this rule to match endpoints that are exposed to any published vulnerability whose Severity is Critical.
-
Windows Updates Required (Important): Use this rule to match endpoints that are exposed to any published vulnerability whose Severity is Important.
-
Windows Updates Required (Low): Use this rule to match endpoints that are exposed to any published vulnerability whose Severity is Low.
-
Compliant: Endpoints not matched by previous rules are assumed compliant with current Microsoft vulnerability updates. No actions are applied to matching endpoints.
Rules 5-8 apply the following actions to vulnerable endpoints:
-
Add to Group: The Add to Group action assigns endpoints with the specified vulnerabilities to the Windows Not Updated group.
-
Start Windows Updates: The optional Start Windows Updates action to download vulnerability information to the endpoints. This action is disabled by default.
-
Windows Self Remediation: The optional Windows Self Remediation action sends the user links to the updates and patches that must be downloaded and installed to correct the discovered vulnerabilities. This action is disabled by default.
Configure Windows Update Compliance Template v2
Prerequisites
-
Detected endpoints must already be categorized by the Primary Classification policy.
-
In environments that use Corporate/Guest user management features, a Corporate/Guest Control policy must identify corporate endpoints.
-
For vulnerability detection and remediation, endpoints must be manageable using Remote Inspection or Secure Connector.
Configure the Template
To configure the template:
-
Log in to the Forescout Console and select the Policy tab.
-
Select Add from the Policy Manager. The Policy Wizard opens.
-
Expand the Compliance folder and select Windows Update Compliance Template v2.
-
Select Next. The Name pane opens.
Name the Policy
The Name pane lets you define a unique policy name and useful policy description. Policy names appear in the Policy Manager, the Views pane, NAC Reports and in other features. Precise names make working with policies and reports more efficient.
-
Define a unique name for the policy you are creating based on this template and enter a description.
-
Use a name that clearly reflects what the policy does. For example, do not use a generic name such as My_Compliance_Policy.
-
Use a name that indicates what the policy verifies, and which actions will be taken.
-
Use a name that indicates whether the policy criteria must be met or not met.
-
Avoid names similar to existing policies.
-
-
Select Next. The Scope pane and IP Address Range dialog box opens.
Define Which Endpoints will be Inspected Policy Scope
-
Use the IP Address Range dialog box to define which endpoints are inspected
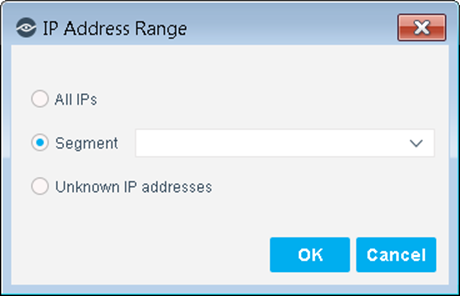
The following options are available:
-
All IPs: Include all IP addresses in the Internal Network.
-
Segment: Select a previously defined segment of the network. To specify multiple segments, select OK or Cancel to close this dialog box, and select Segments from the Scope pane.
-
Unknown IP addresses: Apply the policy to endpoints whose IP addresses are not known. Endpoint detection is based on the endpoint MAC address.
-
Select OK. The added range appears in the Scope pane.
-
Select Next. The Sub-Rules pane opens.
-
Select Finish to create the policy.
-
On the Policy Manager, select Apply to save the policy.
Install the Windows Vulnerability DB Module
To install the module:
- Navigate to the Downloads page on the Customer Support Portal.
-
Download the
.fpifile for the component. -
Save the file to the machine where the Console is installed.
-
Log into the Console and select from the menu.
-
Select Modules > Install. The Open dialog box opens.
- Browse to and select the saved component
.fpifile. -
Select Install. The Installation screen opens.
-
Select I agree to the License Agreement to confirm that you have read and agree to its terms, and then select Install. The installation cannot proceed unless you agree to the License Agreement.
The Installation begins immediately after selecting Install and cannot be interrupted or canceled.In modules that contain more than one component, the installation proceeds automatically one component at a time. -
When the installation completes, select Close to close the window. The installed component (module or plugin) is displayed in the Modules pane.
Some components are not automatically started following installation. -
Start the plugin. In Tools > Options > Modules, right-click on the component name in the Modules pane. In the menu that appears, click Start.
-
To confirm that your installed and configured component is running, in Tools > Options > Modules, hover over the component name in the Modules pane to view a tooltip indicating whether it is running on devices in your development.
 - The component is stopped on all eyeSight devices.
 - The component is stopped on some eyeSight devices.
 - The component is Running on all eyeSight devices.
 minute read