The Forescout eyeSight policy manager
Define and manage policies from the Forescout eyeSightPolicy Manager. Select the Policy tab to work with the Policy Manager.
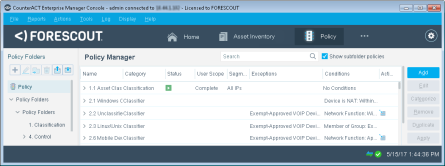
The following information can be displayed in the Policy Manager for each policy:
> (show sub-rules)
Toggle display of a policy's sub-rules.
Name
The name assigned to the policy.
Status 

Indicates whether the Forescout eyeSight detection mechanism is paused or running. When paused, new detection events are ignored.
Category
The category assigned to the policy.
Dashboard Tags
The dashboard tag applied to a policy sub-rule. See Tag Sub-Rules for Dashboard Widgets for details.
Description
The policy description.
Conditions
The properties inspected on endpoints, i.e., specific OS systems, antivirus updates, registry information, etc.
Scope
The endpoints that are inspected for this policy.
Actions
Measures taken at the endpoint if it matches the policy.
Recheck
The conditions under which to recheck endpoints that match the policy. Specifically, you can define:
How often endpoints are rechecked after they match a policy.
Under what conditions to carry out the recheck.
Groups
Forescout groups included in the policy inspection. See Working with Forescout Groups for details.
Segments
The range of IP addresses to be inspected for the policy. See Define Policy Scope for details.
Exceptions
The range of IP addresses excluded from policy inspection.
User Scope
The range of endpoints a Forescout operator can view and work with.
Complete: Indicates that the policy scope is within the user scope and the policy can be edited.
Partial: Partial access is available. The policy can only be viewed.
None: No access is available. The policy can only be viewed.
Path
The path to the policy (in the Policy Folders pane of the Policy Manager).
The Policy Manager provides the following tools:
Add
Create a new policy.
Edit
Edit an existing policy. You can also right-click a policy or sub-rule in the Policy Manager and select Quick Edit.
Remove
Remove a policy.
Duplicate
Duplicate a policy, and then edit as required.
Categorize
Categorize policies to help you organize and view them in the Policy Manager. For example, display only those policies labeled as Compliance policies. In addition, a Compliance folder and Corporate/Guests folder in the Views pane of the Console displays all policies according to their category.
These categories are also used by:
Forescout Compliance Center
Dashboards (Device Compliance widgets)
Site Map
Compliance Status property
Corporate/Guest Status property
See Categorizing Policies for details.
Dashboard Tag
Apply dashboard tags to policy sub-rules to display matched devices in relevant Dashboard widgets.
See Tag Sub-Rules for Dashboard Widgets for details.
Move to
Assign a policy to a folder. Folders are used to organize policies into logical groups for easier navigation and management in the Policy Manager. For example, create East Coast Finance and West Coast Finance folders and place the appropriate policies in those folders. These folders also appear in the Views pane in the Console. See Manage Policy Folders for details.
Stop
Stop the policy activation. When stopped, the detection mechanism is halted. Actions carried out on endpoints previously detected are maintained.
Start
Start the policy activation.
Export
Export policies of interest. Policies are exported as XML files.
Custom
Create custom reusable policy conditions. Select Custom from the Tools menu. See Authentication Properties for details.
Generate Policy Report
Generate a report listing all your policies and policy definitions.
Select Policies Summary Report from the Reports menu.
Apply
Apply changes you made in Policy Manager. You must select Apply to save changes, for example, new policies you created.
Manage policy folders
Use the Policy Folders pane to organize your policies into logical folders for easier navigation and management. These folders appear in the Views pane of Home view.
The following tools are available in the Policy Folders pane:
>
Toggle display of the contents of a node in the Policy Folders tree.

Add a folder as a child of the selected node. You can also right-click a node and
select New Policy Folder.

Delete the selected node. If you create and then delete a folder, any policies in
the folder will also be deleted.

Move the selected node its children to another location in the tree. The selected
node is moved under the new parent node that you specify.
You can also drag and drop nodes of the tree.

Select Export to save segment definitions of the selected
node and its children to a file.
Select Import to create a new branch at the selected node
based on definitions in a file.
Segment definitions are expressed in a structured XML file, or in a CSV file that
lists each segment definition.
You can also right-click a node in the segment tree and select
Export or Import.


Select the Import icon
from the Policy Folders pane or right-click in the Policy Folders pane and select
Import. Complete the
fields in the Import Policy Folder dialog box, where:
- Target Node is the destination.
- Import Mode is the method used to import the policy folder, either as a sub-folder of the folder in the original location (Add folder to the target) or as a sub-folder of the target itself (Add folder content to the target).
- File name is the name of the policy to import.
By default, policies are imported as XML files.
If you import a policy that refers to groups not defined on
the Appliance, these groups are automatically created however the groups will not
contain any members.
If you import a policy with a segment that does not exist, you
receive a warning message and the policy is imported without the segment.
When policy conditions or actions include login credentials for network devices,
servers, or services, the exported policies are encrypted. When you export these
policies, you are prompted for a password that is used to encrypt the exported file.
When you import these properties, you are prompted for the password.
 minute read