Working with actions
Actions are measures taken at endpoints, ranging from notices, warnings and alerts to remediation, network and web access restrictions, and complete blocking.
In addition to the actions delivered with your Forescout system, other actions may become available when you install modules and (Undefined variable: product-names.eyeExtend) modules. For example, if you are working with the Forescout Wireless Plugin or the (Undefined variable: product-names.forescout-eyeextend) for FireEye HX, actions delivered with these components are available. See Base Modules, Content Modules, and (Undefined variable: product-names.eyeExtend) Modules for information about working with plugins and (Undefined variable: product-names.eyeExtend) modules. Refer to the related plugin or (Undefined variable: product-names.eyeExtend) module Configuration Guide for details about these actions.
Enabling and disabling actions
You can create actions for all your policies, and enable and disable them as required. You may need to disable actions, for example, to test your policies and get a sense of network compliance before communicating with network users or taking actions on network devices. Actions can be enabled or disabled from:
- Home view, Detections pane.
- Home view, Views pane. See Stop and Start Policy Actions for details.
- A policy. See Enabling and Disabling Actions for details.
Action schedules
Action schedules can be assigned to each policy action. This lets you control when actions are carried out and for what duration. For example, you can create a policy that warns users not to run peer-to-peer applications and then blocks their Internet access if applications are detected after the warning period. See Action Schedules for details.
Property tags in actions
Property tags can be incorporated in email and HTTP actions. For example, the User Directory mail tag {ad_mail} can be added to an Action notification. This tag is translated to the actual email address of the user logged in to the detected machine. See Property Tags for details.
Action thresholds
Action thresholds automatically implement safeguards when rolling out blocking and restrictive actions.
Action thresholds are designed to automatically implement safeguards when rolling out such sanctions across your network. Consider a situation in which you defined multiple policies that utilize a blocking action, for example, the Virtual Firewall or Switch Block action. In a situation where an extensive number of endpoints match these policies, you may block more endpoints than you anticipated.
An action threshold is the maximum percentage of endpoints that can be controlled by a specific action type defined at a single Appliance. Working with thresholds gives you greater control over how many endpoints are simultaneously restricted in one way or another.
See Working with Action Thresholds for details.
Scripts and interactive actions
Several actions require that Forescout eyeControl run scripts on the endpoint. Refer to the HPS Inspection Engine Configuration Guide. for details about how scripts are run using Remote Inspection or SecureConnector. Select , select the plugin, and then select Help.
Typically, scripts are run in the background, but actions such as the HTTP Notification and HTTP Login actions initiate end user interaction. Forescout eyeControl can run interactive scripts on Macintosh endpoints running the following shell types:
- sh
- bash
- csh
- tcsh
Evaluate commands and scripts
Unlike other script actions, these properties and actions run scripts and commands on the CounterACT appliance itself, and not on endpoints. In addition, you can use the script result as a policy condition.
To specify a script or command for these properties and actions, do one of the following:
- Enter a script name or command directly in the Command or Script field. To include host properties in the command statement, select Add Tags to insert data tags that resolve to host property values.
- Select the Command or Script drop-down menu to view recently selected scripts and commands.
- Select the ellipsis icon
 to build a library of scripts for this action. Scripts that you add appear in the command or script drop-down menu.
Accessing console actions
Actions can be incorporated into policies and carried out when certain conditions are met. For example, you can create a policy that detects users working with unauthorized instant messaging applications, and use a Forescout actions that kills those applications.
Alternatively, you can manually apply an action on selected endpoints.
Access actions:
- From the Home view, Detections pane.
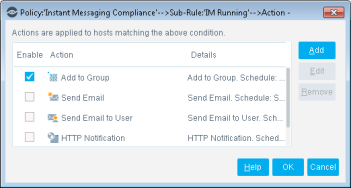
- When creating and editing a policy. Right-click a policy Main Rule or Sub-Rule from the Policy Manager. Select Quick Edit, and then select Actions. The Policy Action dialog box opens.
Enable and disable actions in policies
You can create actions for all your policies, and enable and disable them as required. You may need to disable actions, for example, to test your policies and get a sense of network compliance before communicating with network users or taking actions on network devices.
Policies can be enabled or disabled from the:
- Policy wizard: open the policy and edit a rule. Select or clear the checkbox beside the action in the Actions section.
- Home view, Detections pane.
- Home view, Views pane. See Stop and Start Policy Actions for details.
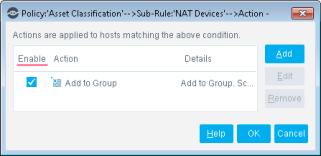
Send message to Syslog action
The Send Message to Syslog action is included by default as an Audit action.
The Send Message to Syslog action is used by the Syslog Plugin to send a message to the Syslog server. This message overrides Syslog Plugin configuration options.
The action exposes the following settings:
If you specify any of the options for the action, Add Tags is enabled. You can add property tags to the message. The tag is translated to the current information associated with the tag. See Property Tags for details.
Authenticate actions
This topic describes actions that control the access of corporate and guest users to a corporate network. These actions are provided by the User Directory Plugin.
- User Directory Management
- Corporate and Guest Management
HTTP login
Use the HTTP Login action to:
- Prompt endpoint users to authenticate or self-register before accessing your network. Users attempting to access the network access the Login pane and must enter valid credentials.
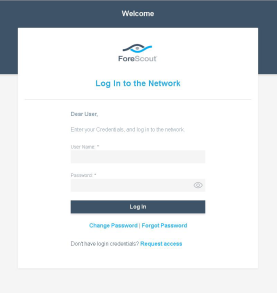
The action can be configured to handle guest and corporate users. For details, see Handling Guests and Handling Corporate Users.
Configurable HTTP Login action options let you:
- Define the servers against which the user will authenticate.
- Enable and define a registration process by which unauthorized users can request network access via a web registration form. You may want to enable this if your organization allows visitors to access the network.
- Define login requirements so that users can skip authentication and registration, and enter the network with limited access.
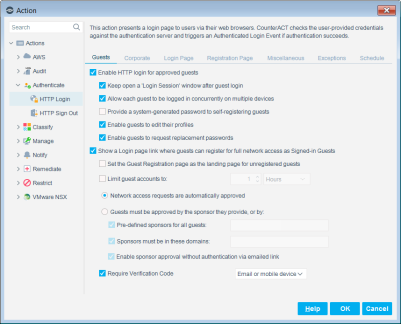
This action can be used with other policy actions. For example, you can define a policy quarantining all unauthenticated users to an isolated VLAN. If the user logs in properly, the policy's actions are canceled, removing all limitations imposed. In this example, the user is removed from the isolated VLAN and can join the network and browse.
Note: Web messages and emails used in this action can be changed and localized. See Localize Redirected Web Pages and Messages for details.Note: Login failures can be easily tracked. See HTTP Login Attempts for details.Note: You can customize the text that the HTTP Login action displays at the user's endpoint. See Customize HTTP Login Action Text for details.Depending on the endpoint operating system and how the endpoint is managed, this action is implemented by the HPS Inspection Engine, the Linux Plugin, or the OS X Plugin.
This section describes how to work with the HTTP Login action when handling network guests. For example, you can create policies that deal with visiting professionals or contractors.
Guests are authenticated against the Appliance.
You can define the action so users who do not have authentication credentials can register as guests using a Guest Registration form that is displayed in the user's web browser. In the Login page, guests select Request access to open a Guest Registration page.
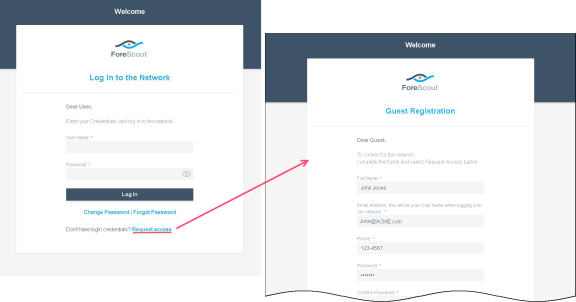
Configure the HTTP Login action for guest login on the following tabs:
- Guests Tab: Defines how authentication and registration is performed.
- Registration Page Tab: Defines which information guests must provide in the Guest Registration form.
- Login Page Tab: Defines the text that appears on the Login page.
- Miscellaneous Tab: Defines additional configuration options, such as encryption and compliance.
Use the Corporate options to enable corporate authentication.
To configure the action for corporate users, use the following tabs:
- Corporate Tab: Defines which servers are used for authentication.
- Login Page Tab: Specifies the text that is to appear on the Login page.
- Miscellaneous Tab: Specifies addition configuration options such as encryption and compliance.
Login page tab
The Login Page tab is used to define the content of the Login page that is displayed to both guest and corporate users.
After the user successfully logs in, the Authentication, Signed In Status property is resolved as either Signed In as a Guest, if the user's status is network guest, or Signed In as a Domain User, if the user's status is corporate user.
The User Name entered is used when resolving the property. If necessary, you can instruct Forescout eyeControl to use the machine name instead of this name or to use this name when the machine name is not available. Refer to the HPS Inspection Engine Configuration Guide for details.
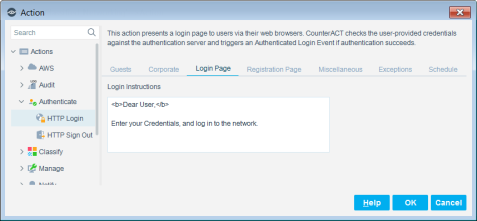
The following options are available on the Login Page tab:
Guests tab
Use the HTTP Login - Guests tab to define guest login session options, as well as a registration strategy.
Guest login session options
These options let you control the guest login experience.
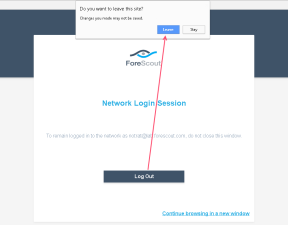
Guest registration options
The following guest registration options are available:
- Pre-defined sponsors for all guests
- Sponsors must be in these domains
- Enable sponsor approval without authentication via email
Allow only pre-approved guests
If all guests must be pre-approved for network access, clear the Show a Login page link where guests can register for full network access as Signed-in Guests check box. Information about pre-approved guests is saved on the Appliance. When pre-approved guests log in to your network, their credentials are checked against this information. Pre-approved guests can be added by:
- A sponsor in the Guest Management Portal.
- A Forescout operator in the Guest Management Pane. It is the responsibility of your organization to forward login credentials to these pre-approved guests. The eyeSight does not do this.
Allow Automatic Approval of Registered Guests
For guests to be automatically approved after submitting a Guest Registration form, select the Network access requests are automatically approved option. You may want to do this if you anticipate many guests and do not have the resources to accept or reject each one, but do want to keep track of who is registered. Approved guests are displayed in the following locations:
- In the Guest Management Portal where sponsors can view the registered guests that specified them as their corporate contact.
- In the Guest Management Pane, select Options from the Tools menu and then navigate to and select Guest Registration to display the Registered Guests tab and view the registered guest entries.
If you require that guests be explicitly approved by an individual in your organization - a corporate sponsor - select the Guests must be approved by the sponsor... option. The sponsor specified by the guest on the Guest Registration form receives a notification email that includes a link to the corporate Guest Management Portal. After logging in to the portal, sponsors can approve or decline network access to guests awaiting approval.
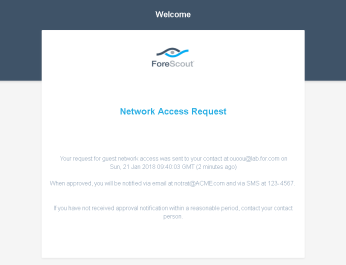
Before sponsor approval is completed, a notification page indicates that a network access request has been sent to the contact. The guest receives an email notification once access is approved.
Enable Sponsor Approval without Authentication via Emailed link
The guest registration request notification email that is sent to sponsors always includes a link to the corporate Guest Management Portal. Select Enable Sponsor Approval without Authentication via Emailed link to include an additional link in the notification email to a Network Access Request page containing the specific guest registration request.
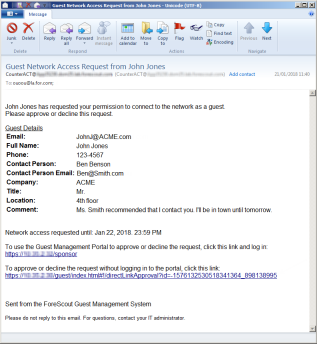
- The first link opens the Login page of the Guest Management Portal, where a sponsor can log in and administer all their guest registration requests.
- If the Forescout user selected the Enable sponsor approval without authentication via emailed link option in the Guests tab of the HTTP Login action, then a second link is included. This link opens a Network Access Request page, where the sponsor can approve or decline the network access request of the specific guest.
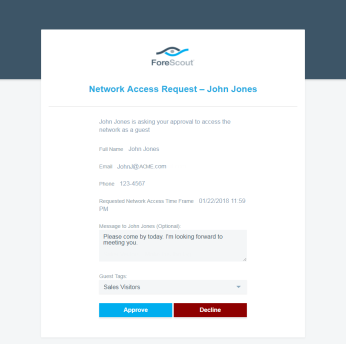
This option is useful if:
- You do not want to require sponsors to log in to the Guest Management Portal to approve guest registration requests.
- Sponsors are temporarily unable to access the Guest Management Portal.
- Your organization does not employ an Active Directory server to verify the credentials of its personnel. (Logging in to the Guest Management Portal requires Active Directory verification of user domain credentials).
Use of this option maintains backward compatibility with HTTP Login action functionality of previous versions.
Viewing Registered Guests
Approved guests can be viewed in the Guest Management Portal and in the Guest Management Pane.
HTTP sign out
The HTTP Sign Out action signs out detected endpoints that meet the following criteria:
- The endpoint user is currently signed in to the network via the HTTP Login action.
- The endpoint displays a Forescout Login Session window.
- The Signed In Status condition is tested to resolve the endpoint's login status.
Note: Corporate/Guest Control policies created using the template provided in eyeSight version 8.0 and above do not test the Signed In Status condition. If the HTTP Sign Out action is run, it has no effect on the endpoint's HTTP Login status. To sign out these endpoints, go to the endpoint's Profile tab, and select the eraser icon before the Authentication Login property.
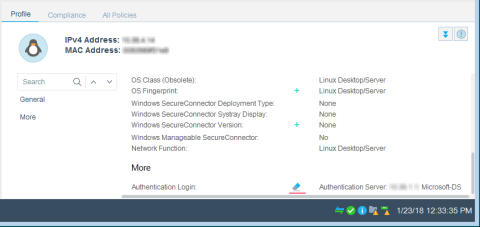
Use the action, for example, in a policy that requires users to re-authenticate following a specific event, such as a Link Down Trap (Trap Received property).
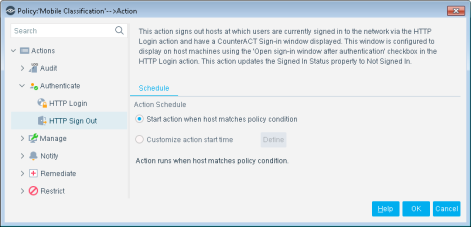
The HTTP Sign Out action updates the Authentication, Signed In Status property of the detected endpoint to Not Signed In.
Depending on the endpoint operating system, and how the endpoint is managed, this action can be implemented by the HPS Inspection Engine, the Linux Plugin, or the OS X Plugin.
Classify actions
Set function classification
The Set Function Classification action lets you override a Function property value set by eyeSight.
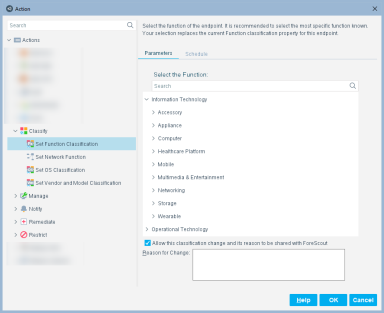
This is useful in the following situations:
- The classification resolved by eyeSight is not correct or eyeSight was not able to classify the endpoint based on its function.
- You are able to refine the device's classification. For example, eyeSight classified the device function as Healthcare, but you know it is actually an X-Ray device.
- The endpoint was excluded from the range of endpoints to be classified due to its sensitivity to probing.
If the Primary Classification template was deployed with the Add to Group actions enabled, the classified device is added to the related classification group. See Primary Classification Template for details.
If you agree to provide the Forescout Research Program with information about the change, select the checkbox, and enter:
- The reason why the selected classification is appropriate for this endpoint
- The ideal classification for this endpoint, if it is not in the classification list
Your feedback is sent to Forescout to help provide better classification services.
Set OS classification
This action lets you override an Operating System property value set by eyeSight.
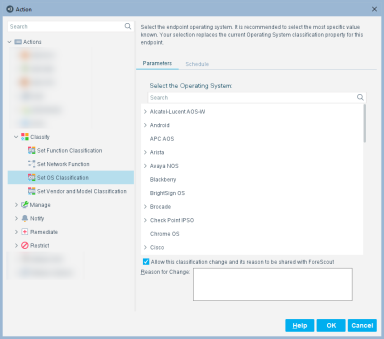
This is useful in the following situations:
- The classification resolved by eyeSight is not correct or eyeSight was not able to classify the endpoint based on its operating system.
- You are able to refine the device's classification. For example, eyeSight classified the operating system as Macintosh, but you know it is actually macOS 10.12 - Sierra.
- The endpoint was excluded from the range of endpoints to be classified due to its sensitivity to probing.
If the Primary Classification template was deployed with the Add to Group actions enabled, the classified device is added to the related classification group. See Primary Classification Template for details.
If you agree to provide the Forescout Research Program with information about the change, select the checkbox, and enter
- The reason why the selected classification is appropriate for this endpoint
- The ideal classification for this endpoint, if it is not in the classification list
Your feedback is sent to Forescout to help provide better classification services.
You can easily reset a manual classification assignment to that set by the Device Classification Engine by selecting Revert to Suggested Operating System Classification from the Cancel Actions drop-down menu.

Set vendor and model classification
This action lets you override a Vendor and Model property value set by eyeSight.
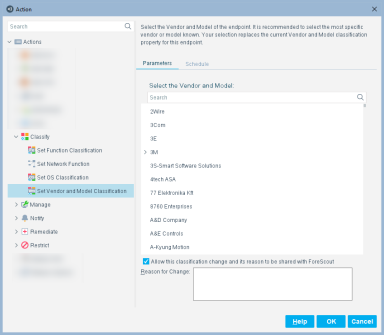
This is useful in the following situations:
- The classification resolved by eyeSight is not correct or eyeSight was not able to classify the endpoint based on its vendor and model.
- You are able to refine the device's classification. For example, eyeSight classified the vendor and model for the host as Apple, but you know it is actually Apple TV.
- The endpoint was excluded from the range of endpoints to be classified due to its sensitivity to probing.
If the Primary Classification template was deployed with the Add to Group actions enabled, the classified device is added to the related classification group. See Primary Classification Template for details.
If you agree to provide the Forescout Research Program with information about the change, select the checkbox, and enter:
- The reason why the selected classification is appropriate for this endpoint
- The ideal classification for this endpoint, if it is not in the classification list
Your feedback is sent to Forescout to help provide better classification services.
You can easily reset a manual classification assignment to that set by the Device Classification Engine by selecting Revert to Suggested Vendor and Model Classification from the Cancel Actions drop-down menu.

Set network function
This action lets you manually set a Network Function property value. This property is relevant only in environments running a legacy Asset Classification policy.
After a device is classified using its Network Function property value, it is added to the related Asset Classification group, provided that the Asset Classification policy template was deployed.

You can easily reset a manual classification assignment to that set by the Device Classification Engine by selecting Cancel Manual Network Function Classification from the Cancel Actions drop-down menu.
Manage actions
This section describes actions that manage endpoints.
Add to group
A group is a collection of IP addresses that has something in common. For example, a group may contain endpoints that are printers. Use the Add to Group action to place endpoints that match a policy condition into a group.
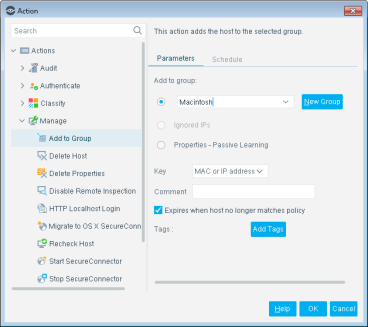
Specify the group to which endpoints are added:
- To add endpoints to an existing group, select the first option and do one of the following:
- Type the group name in the search field to locate it in the group tree.
- Drop-down the group tree and navigate to the group.
- To create a new group and add the endpoint to it, select New Group. Specify a Name and Description, and indicate the new group's location in the tree.
- Select Ignored IPs to add endpoints to the Ignored IPs group; endpoints in this group are ignored by NAC and Discovery policies. See Creating an Ignored IP Address List.
- Select Properties - Passive Learning to add endpoints to the Properties - Passive Learning group; Forescout eyeSight never contacts endpoints in this group to resolve properties, even for policy evaluation. See Restricting Endpoint Inspection for details.
Specify additional action options
- Select Expires when host no longer matches policy if you want the endpoint to be removed from the group when it no longer matches the policy condition. When this option is cleared, you must manually remove endpoints from the group using Groups Manager. See Working with Forescout Groups.
Note: You can customize the text that the HTTP Login action displays at the user's endpoint. See Customize HTTP Login Action Text for details.
- Specify the Key, the value by which each endpoint is associated with the group. Forescout eyeSight detects group association based on this value.
Note: You can customize the text that the HTTP Login action displays at the user's endpoint. See Customize HTTP Login Action Text for details.
Add label
Labels mark and group endpoints based on properties or other evaluated values. Policies can apply further management logic based on labels assigned by a previous policy. This lets you construct complex policy behaviors that track endpoint history.
This action requires that the Advanced Tools Plugin is running.
The Add Label action assigns a text label to endpoints that match the conditions of the policy. This action is located in the Manage group of the Actions tree.
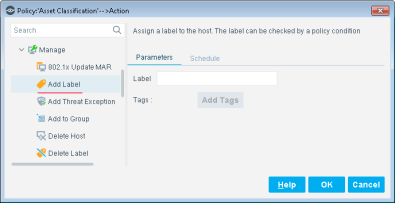
In the Label field, define the label text. The label can combine static text strings and endpoint-specific information. Select Add Tags to insert data tags that resolve to host property values. Labels are listed with other endpoint details in Home and Asset Inventory views.
Add value to list
This action requires that the Advanced Tools Plugin is running.
Use the Add Value to List action to place property values that match a policy condition into a list. For example, place all logged-in users of hosts at which a malicious event was detected by eyeSight into a Malicious Users list. You can then use this list to define a policy that performs a restrict action on other hosts where the user logged-in to.
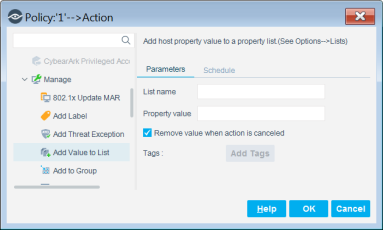
In the List name field, enter the name of the list that you want to add the property value to. The list name you enter must match the name of a previously defined list.
In the Property value field, use tags to define endpoint-specific property values. Select Add Tags to insert data tags that resolve to host property values.
Select the Remove value when action is canceled option to remove the value from the list when the action is canceled (i.e. when the host no longer matches the policy rule).
See Defining and Managing Lists for more information about lists.
Delete label
Labels mark and group endpoints based on properties or other evaluated values.
This action requires that the Advanced Tools Plugin is running.
The Delete Label action removes a text label from endpoints that match the conditions of the policy. This action is located in the Manage group of the Actions tree.
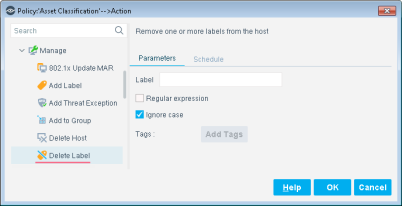
In the Label field, define the label text. The label can combine static text strings and endpoint-specific information. Select Add Tags to insert data tags that resolve to host property values.
To delete several labels, enter a string using wildcard characters and then select Regular expression. All partially matched labels are deleted.
Select Ignore case to match label strings regardless of the use of uppercase or lowercase letters.
Delete host
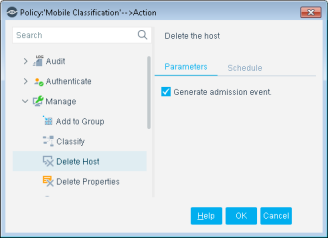
This action lets you instruct eyeSight to delete endpoints detected in a policy. Select Generate admission event to rediscover endpoints immediately after they are deleted. When you clear the checkbox, endpoints are rediscovered after they generate traffic.
Delete properties
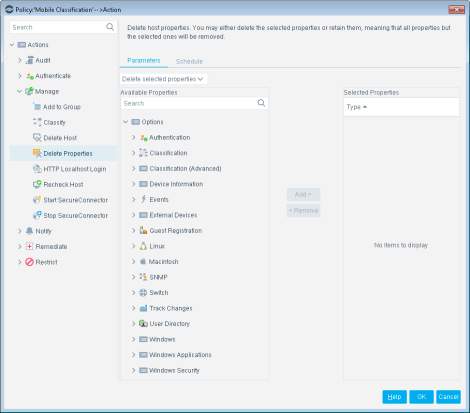
The Delete Properties action lets you instruct eyeSight to clear all detections made on endpoints. Clearing cancels any actions assigned to the endpoints as a result of the detection.
Select Generate admission event to reevaluate the endpoint immediately after the detections are cleared. When you clear the checkbox, properties are evaluated after an endpoint generates traffic.
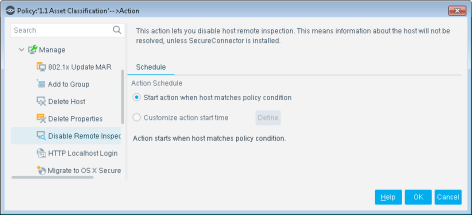
Disable remote inspection
The Delete Remote Inspection action instructs eyeSight not to resolve host properties for the endpoint using Remote Inspection. Actions are still applied to the endpoint. This action is maintained as long as the endpoint matches the conditions of the policy rule, or until the action is manually canceled for the endpoint.
This action may be useful in situations where administrators want to minimize traffic and deep inspection of sensitive computers at sensitive times. For example, Forescout administrators can use this action to support end users on trading floors or in process control environments that require minimal endpoint traffic and CPU overhead during periods of peak activity. Deep endpoint inspection can be performed using remote inspection during downtime periods.
Endpoints managed using SecureConnector are not affected by this action.
HTTP localhost login
Use the HTTP Localhost Login action to detect unmanageable guest endpoints, and allow users at the endpoints to authenticate. After the endpoints are authenticated, they can be included in all policy inspections
You may need to inspect guest machines that are not part of the network domain, ensure that they comply with corporate policies, and enforce network restrictions that are not in compliance. These endpoints are referred to as unmanageable hosts and can be included in your policy.
If you are using Flexx licensing, ensure that you have a valid eyeControl license to use this action. Refer to About Flexx Licenses in the Forescout eyeSight Administration Guide for more information about managing licenses.

Users at unmanageable endpoints are presented with an HTTP Login page when they attempt to access the web, and must provide their local login credentials to gain web access. If you have assigned other actions to the policy and the authentication is successful, all the policy's actions are canceled, removing all the limitations imposed.
If you think login credentials might not be available to users and do not want to limit their access, you can allow guest login to the web by selecting Allow Guest Login. When selected, the Login page includes a guest link option. You may want to do this, for example, when the guest user does not authenticate and is blocked from your network, but allowed web access.
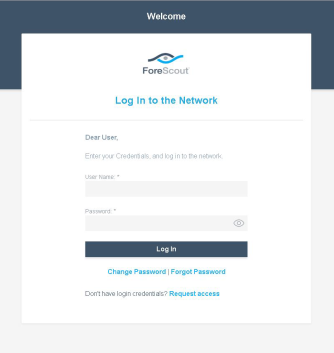
The network user is prompted with a Login page on each attempt to access the web, until:
- The user successfully logs in.
- The endpoint is released via the Home view, Detections pane or Assets Portal.
- The guest login option is selected (when enabled).
It is recommended to select Use Encrypted protocol (HTTPS) to send the redirected page via HTTPS. To send it via the non-encrypted HTTP protocol, clear the Use Encrypted protocol (HTTPS) option. See Transmitting Actions via HTTPS for details.
When using this action, you should configure the following condition properties. Use the ANDvalue between both properties:
- Windows>Manageable Domain>Does not meet the following criteria
- Windows>Manageable Local>Does not meet the following criteria
Depending on the endpoint operating system and how the endpoint is managed, this action is implemented by the HPS Inspection Engine, the Linux Plugin, or the OS X Plugin.
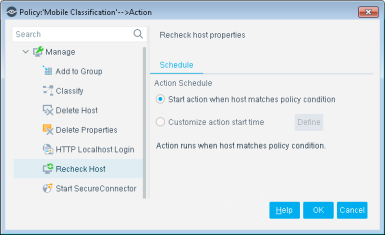
Recheck host
Use the Recheck Host action to recheck endpoints against conditions defined in a policy.
Set device criticality
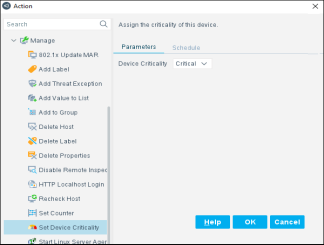
The Set Device Criticality action lets you optionally assign device criticality according to the configuration of the device in your environment.
For example, assign device criticality according to device function, network segment, or device group.
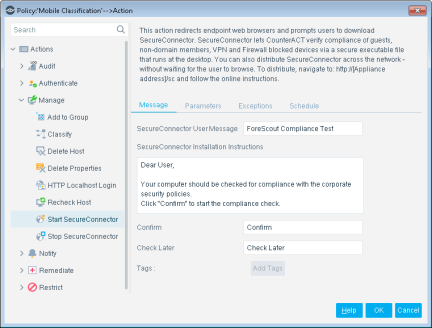
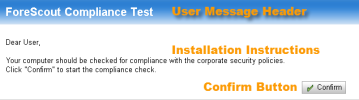
Message Tab
Use this tab to customize the notification page that is displayed to the end user. The message is displayed when the installation method chosen from the Parameters Tab is either HTTP Installation at the endpoint or Both.
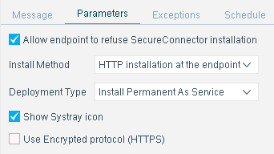
Use this tab to define Start SecureConnector installation and deployment parameters.

Set counter
This action creates or increments a counter. This action is located in the Manage group of the Actions tree.
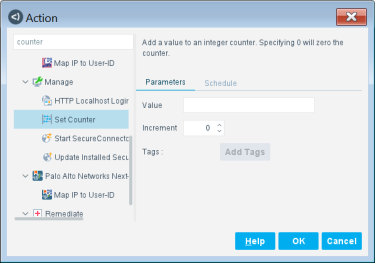
Use the following fields to define an action that creates a new counter or increments an existing counter.
When you create a policy that defines a new counter, use only the Set Counter action. A policy that increments an existing counter must use both the Counter property and the Set Counter action. See Set and Increment Counters for details.
Notify actions
This topic describes actions used for communicating with endpoint users.
HTTP notification
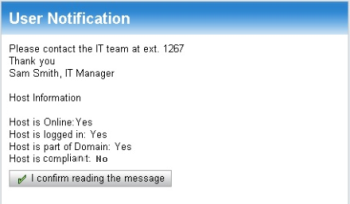
The user's web session is redirected when attempting to access the web. The user is presented with a message that you compose.
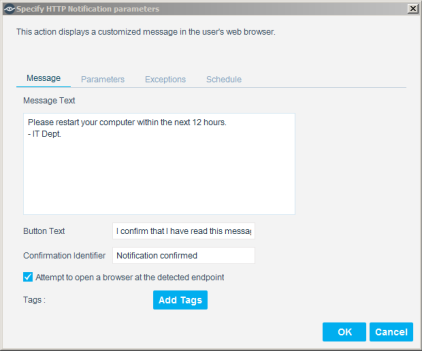
Web sessions are redirected until:
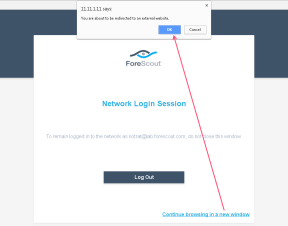
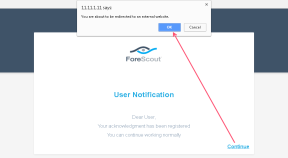
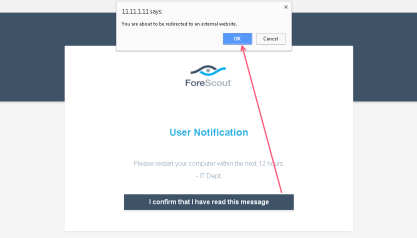
- The user confirms reading the message. See Parameters Tab for more information. After confirmation, a pop-up message informs users that they are being redirected to an external website.
- The endpoint is released via the Home view, Detections pane or Assets Portal.
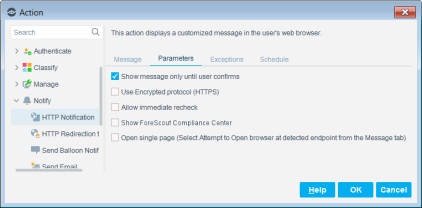
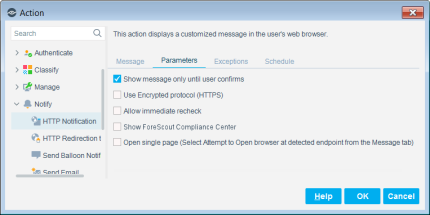
- To allow the endpoint user to only confirm the message once, select Show message only until user confirms.
- To send the redirected page via HTTPS, select Use Encrypted protocol (HTTPS). See Transmitting Actions via HTTPS for details.
- Endpoints users can run a policy recheck directly from the notification page by selecting Allow immediate recheck. This allows endpoints to verify compliance status in between defined rechecks. On-demand rechecks at the endpoint enable faster overall network compliance and increase productivity. You can hide this option by clearing Allow immediate recheck.
- Select Show ForeScout Compliance Center to display the Login page at the endpoint. If the endpoint has been assigned compliance policies, they will also appear in the wizard. See Working with the Forescout Compliance Center for details.
- Select Open single page to only redirect the first web browser tab, allowing the user to continue browsing in other tabs. Verify that Attempt to open a browser at the detected endpoint is selected on the Message tab.
HTTP redirection to URL
The user's web session is redirected to a specific web page. You can combine this action with the HTTP Notification action, redirect the endpoint web session to a specific site and add a customized message.
If you are using Flexx licensing, ensure that you have a valid license to use this action. Refer to About Flexx Licenses in the Forescout eyeSight Administration Guide for more information about managing licenses.
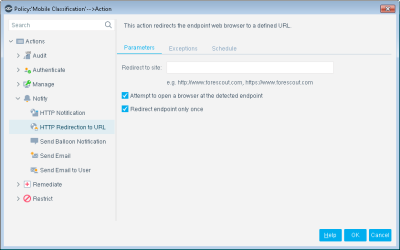
HTTP Redirection to URL
By default, the user's session is redirected when the user attempts to access the web. However, you can define the action to automatically open a browser at the endpoint, instead of waiting for the user to browse. This ensures that the message gets to the user faster. Select Attempt to open a browser at the detected endpoint. (This option is not available for Windows 2000 and Windows 2003 server machines, and only works on managed machines.) Forescout eyeControl uses a script when this option is selected. Refer to the HPS Inspection Engine Configuration Guide for details about how scripts work.
By default, the action is only applied one time during the match period. The first time the end user enters a URL in the web browser, the endpoint is redirected to the URL configured in the action. You can configure this action to continuously apply to endpoints that match the policy rule by clearing the Redirect endpoint only once checkbox. As a result, the endpoint is always redirected to the URL configured in the action within the match period.
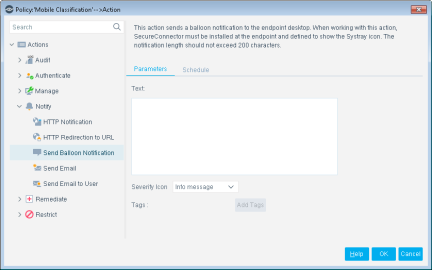
Send balloon notification
Use this action to send a balloon message to the detected endpoint. Use of this feature requires that the endpoint be connected via SecureConnector.
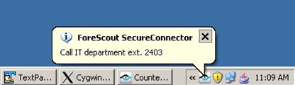
Users can type messages of up to 200 characters and indicate whether the message should appear with an Error, Warning or Information icon.
Balloon messages are displayed in the endpoint system tray.
Send email
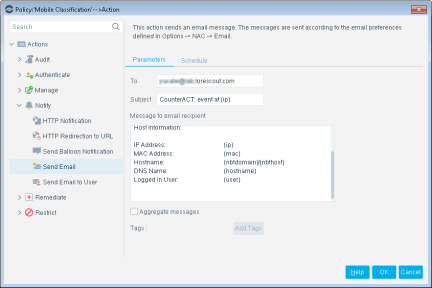
Send an email notification to the administrator or to other addresses. Basic information about the endpoint is displayed by default in the email message. Add additional text as required. When composing the message, you can insert any number of property tags. For example, if you enter {ip}, the IP address at which the events were detected is automatically inserted into the message. See Property Tags for details.
Select Aggregate messages to help you manage email deliveries. When selected, the values set for Policy Email Preferences are applied to this action. Specifically, these preferences define:
- The maximum number of email alerts delivered per day (from midnight)
- The maximum number of events that are listed in each email
You can sign these emails using a digital certificate, as specified by the Secure/Multipurpose Internet Mail Extensions (S/MIME) standard. See Signing Emails with an S/MIME Certificate for details.
See Policy Preferences for details.
Send email to user
This action sends an email message to the User Directory, User Mail Address that is registered with the detected endpoint.
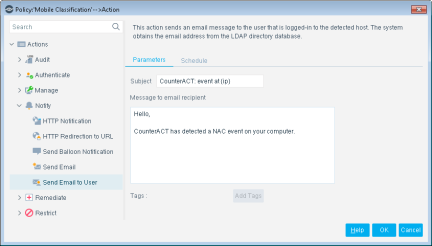
Basic information about the endpoint is displayed by default in the email message. Add additional text as required. When composing the message, you can insert any number of property tags. For example, if you enter {ip}, the IP address at which the event was detected is automatically inserted into the message. See Property Tags for details.
You can sign these emails using a digital certificate, as specified by the Secure/Multipurpose Internet Mail Extensions (S/MIME) standard. See Signing Emails with an S/MIME Certificate for details.
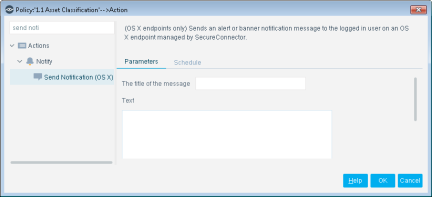
Send notification OS X action
This action sends an alert or banner notification message to an OS X endpoint managed by SecureConnector. The Notification Center of the user currently logged in to the endpoint handles the message. This action parallels the Send Balloon Notification action for Windows endpoints. You can use property tags to include endpoint-specific property values in the notification. See Property Tags for details.
Banner notifications appear briefly on screen. Alerts persist on screen until the user interacts with them.
Remediate actions
Remediation actions help you remediate endpoint vulnerabilities.
If you are using Flexx licensing, ensure that you have a valid eyeSight eyeControl license to use these actions. Refer to About Flexx Licenses in the Forescout eyeSight Administration Guide for more information about managing licenses.
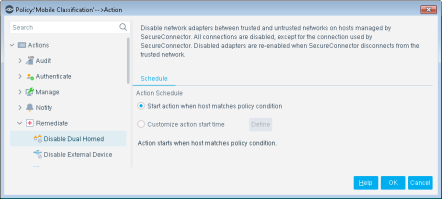
Disable adapters on dual homed devices (Disable Dual Homed) - Windows only
This action disables network adapters that act as a bridge between trusted and untrusted networks on endpoints managed by SecureConnector.
All connections are disabled, except for the connection used by SecureConnector. Disabled adapters are re-enabled when SecureConnector disconnects from the trusted network.
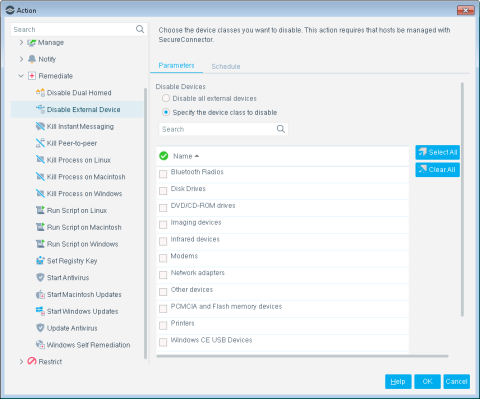
Disable external devices
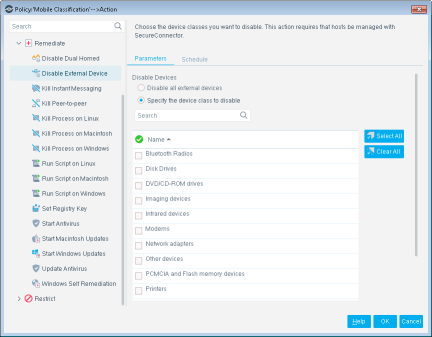
The Disable External Devices action disables external devices connected to Windows endpoints, for example, USB mass storage devices, modems, printers, cameras, NIC cards, PCMCIA, CD/DVD, gaming, and smartphones.
The devices remain blocked until the action is canceled, even if the device is inserted, removed and later reinserted. This action requires that endpoints be managed with SecureConnector, and requires the proper configuration and activation of the HPS Inspection Engine. Use the External Devices property when working with the action.
This action requires that endpoints be managed with SecureConnector. You can automatically install SecureConnector when deploying this action. Select , select HPS Inspection Engine and then select the SecureConnector tab.
Expedite IP discovery
The Expedite IP Discovery action is a remediate action provided by the Switch Plugin. Use this action to address situations of delayed endpoint IP discovery.
The action expedites the resolution of endpoint IP addresses (IP discovery resolve requests) by the Switch Plugin querying the ARP table of designated, adjacent, L3-enabled network devices.
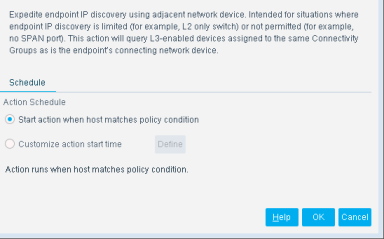
For details about this action, including the symptoms and root causes of delayed endpoint IP discovery, refer to Expedite IP Discovery in the Switch Plugin Configuration Guide.
Restrict actions
Restrict actions are used to restrict endpoint access to the network and Internet .
If you are using Flexx licensing, ensure that you have a valid Forescout eyeControl license to use these actions. Refer to About Flexx Licenses in the Forescout eyeSight Administration Guide for more information about managing licenses.
Switch restrict actions
The Switch Plugin provides the following restrict actions:
For details about these actions, refer to the Switch Plugin Reference Guide.
Access port ACL
Use the Access Port ACL action to define an ACL that addresses one or more than one access control scenario, which is then applied to an endpoint's switch access port. Access control scenarios are typically role or classification driven, for example, registered guest or compliance, and not endpoint IP specific.
For example, implement an ACL action that denies corporate network access to guests but permits Internet access, regardless of endpoint IP address (no IP address dependency).
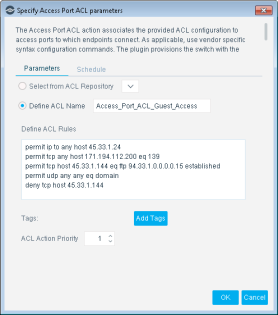
In the ACL configuration, take advantage of the full set of switch capabilities. Forescout eyeControl does not inspect and does not alter the provided content; the plugin's role is one of delivery vehicle to provision a network switch.
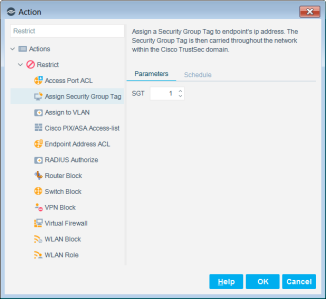
Assign security group tag
Use the Assign Security Group Tag action to assign a Security Group Tag (SGT) to detected endpoints. For this action to be available in the Console, you must enable the advanced configuration flag assign_sgt, which is disabled by default. Endpoints with an assigned SGT are connected to a managed Cisco switch in a Cisco TrustSec domain. An SGT is a number in the range of 1-65,535.
Endpoint address ACL
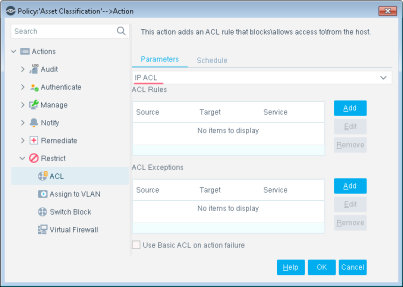
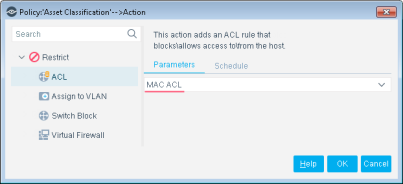
Use the Endpoint Address ACL action to define and apply any of the following, connected endpoint handling:
-
IP ACL: Instruct a switch to close (ACL rule) or to open (ACL exception) network zones, services or protocols to traffic to or from specific, endpoint IP addresses connected to the switch.
-
MAC ACL: Instruct a switch to block all traffic sent from the affected, endpoint MAC address.
Switch block
Use the Switch Block action to completely isolate endpoints from your network by turning off their switch port and preventing endpoints from communicating with the network. This is an extreme action that should be used with care.
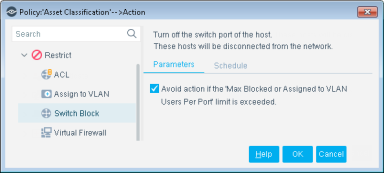
If there is a VoIP device between the switch and the endpoint, that is, a VoIP port with a connected VoIP phone and a connected PC behind the phone, the Switch Block action is supported for the endpoint, when the blocking of VoIP ports is globally enabled in the Switch Plugin for all managed switches.
Virtual firewall
The Virtual Firewall action lets you block access to and from detected Windows endpoints. The action also provides an option to define blocking exceptions. For example, when you define a range of addresses to block, but want to allow traffic to and from IT administrator endpoints or VIP endpoints.
You can configure your system to use the Virtual Firewall action to block endpoints connecting through a proxy server from accessing HTTPS pages when a redirect action is also used. See Blocking HTTPS via Proxy Server.

Endpoints detected via a policy and blocked with the Virtual Firewall, appear in the Virtual Firewall pane, but for display purposes only. Manage these endpoints via the Home view, Detections pane.
Rules created directly via the Virtual Firewall pane take precedence over policies created here.
Creating a blocking rule
This rule lets you block traffic to or from the detected endpoint.
To block traffic:
- In the Blocking Rules section, select Add.
- Select The FW will block
traffic to the detected host to block inbound traffic to detected
endpoints on specified services.
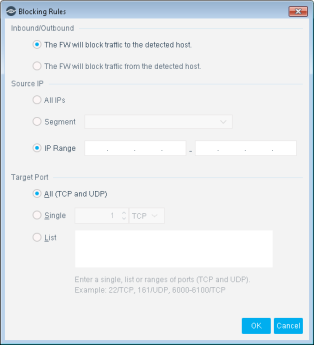
- In the Source IP section, define the endpoints that are prevented from communicating with the detected endpoint.
- In the Target Port section, define the services on the detected endpoint that are blocked.
- Select OK.
The new rule appears in the Blocking Rules list. You can edit or remove rules by selecting Edit or Remove, as required.
To block traffic from the detected endpoint:
- In the Blocking Rules section, select Add.
- Select The FW will block traffic from the detected host. This lets you block outbound traffic from detected endpoints to specific services on other endpoints.
- In the Target Port section, define the endpoints that are prevented from receiving traffic.
- Select OK.
The new rule appears in the Blocking Rules list. You can edit or remove rules by selecting Edit or Remove, as required.
Creating exceptions
You can define exceptions to the blocking rules created. This enables the continuous flow of traffic to or from detected endpoints. For example, when you define a range of addresses to block, but want to allow traffic to and from IT administrator endpoints or VIP endpoints.
To create rule exceptions:
- In the Blocking Exceptions section, select Add.
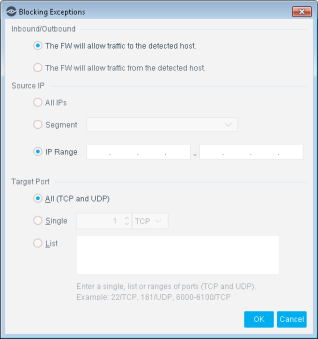
- Select The FW will allow traffic to the detected host to allow inbound traffic to detected endpoints.
- In the Source IP section, define the endpoints that are allowed to communicate with the detected endpoints.
- In the Target Port section, define the services on the detected endpoints that are allowed.
- Select
The new rule appears in the Blocking Exceptions list. You can edit or remove rules by selecting Edit or Remove as required.
To allow traffic from the detected endpoint:
- In the Blocking Exceptions section, select Add.
- Select The FW will allow traffic from the detected host to allow outbound traffic from the detected endpoints.
- In the Target IP section, define the endpoints that are allowed to receive traffic from the detected endpoint.
- In the Target Port section, define the services on the endpoints that are allowed.
- Select OK.
The new rule appears in the Blocking Exceptions list. You can edit or remove rules by selecting Edit or Remove as required.
Blocking HTTPS via proxy server
By default, the Virtual Firewall  action does not block endpoints connecting through a proxy server from accessing HTTPS pages when a redirect action is also used.
To allow this action to block such endpoints, you must modify the system setup and settings as described below.
More action tools
Action schedules
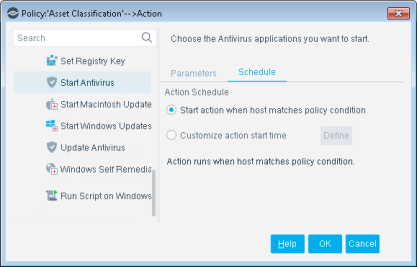
By default, actions are carried out when eyeSight detects that the endpoint matches the policy. Alternatively, action schedules can be assigned to each action. This lets you to control when actions are carried out and for what duration. For example, you can create a policy with an action that sends email to noncompliant users three times a week or for two weeks. When the endpoint complies with the policy, the email will no longer be sent.
Schedules are especially useful when you need to escalate sanctions on noncompliant endpoints. For example, create a policy that warns users not to run peer-to-peer applications and then blocks their Internet access if applications are detected after the warning period.
To create an action schedule, open the policy wizard, select a rule, and open an action for editing. Select the Schedule tab.
Property tags
Property tags can be used to insert endpoint property values in condition or action definition fields. For example, important endpoint or User Directory information can be added to email messages, and endpoint identifiers can be added to comments and labels.
To use a property tag when you configure a Condition or Action, select a text field. Select Add Tags and insert a tag with data relevant to the field.
When the text field is evaluated, the tag is replaced by the actual property value of the endpoint.
Action icon display tool
You can choose a time-period in which to display an Action icon after a one-time action is complete. For example:
- After an email action is performed.
- After network users confirm reading redirected pages.
- After users perform redirecting tasks.
See Display Action Icon after Action Is Complete for details.
Policy action log
The Host Details dialog box provides specific information about actions carried out on detected endpoints. You can view this information from the Console as soon as the endpoint has been detected via the policy. The information displayed provides more details than presented in the Home view, Detections pane. The dialog box lists the current actions and important related information, such as:
- Details entered in notification actions
- The Appliance that carried out the action
- The time the actions were carried out
- Information indicating the action status
An option is also available to export the log.
To view the Actions log, double-click an endpoint from the Home view, Detections pane. The Host Details dialog box opens. Select the Policy Actions tab.
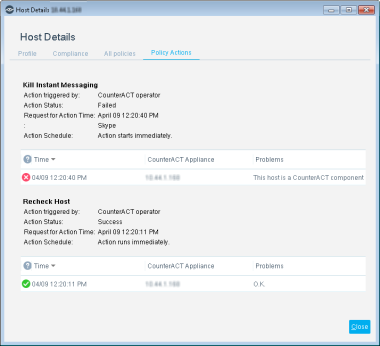
The dialog box lists basic information about the action that you defined and its details.


Right-click the table to export information.
HTTP actions
HTTP actions let you to redirect network user web sessions and replace them with a customized HTTP page. For example, redirect the user's web page and instead display web notification indicating that specific vulnerabilities were detected on their machines. The notification includes a list of links that should be accessed in order to patch vulnerabilities. Users cannot access the web until their endpoint is patched.
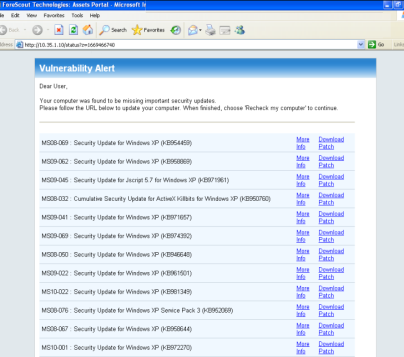
Before using the HTTP actions, review the following:
- HTTP actions require that the Appliance sees traffic going to the web.
- HTTP redirection requires proper injection setup. See HTTP Redirection for details.
- If your organization uses a proxy for web connection, you must define the proxy ports to be used. See Policy Preferences for details.
- You can redirect user Intranet sessions. See Defining HTTP Redirect Exceptions for details.
- You can redirect via HTTPS. See Transmitting Actions via HTTPS.
- You can customize the default look and feel of the HTTP pages delivered to the endpoint. For example, you can add your company logo, and define background colors or background images to these pages. See Customizing HTTP Pages for details.
- Messages that appear in the redirected pages can be changed to the language defined at your operating system. See Localize Redirected Web Pages and Messages for details.
- You can customize HTTP preferences to include redirect exceptions that will not be affected by HTTP actions. These exceptions can be configured either globally or per action. See Defining HTTP Redirect Exceptions for details.
- The DNS Enforce Plugin lets eyeSight eyeControl implement HTTP actions in cases where stateful traffic inspection is not possible. This is relevant, for example, with a remote site or an unmanaged network segment. For more information, refer to the DNS Enforce Plugin Configuration Guide. To open this guide, select , then select DNS Enforce and then select Help.
Transmitting actions via HTTPS
You can configure the connection method used for transmitting redirected traffic. Traffic can be transmitted via HTTPS, i.e., encrypted over a secured connection (TLS) or via HTTP.
If you transmit via HTTPS, network users will see a security alert in their web browsers when they attempt to access the web. The alert indicates that the site's security certificate was not signed by a known Certificate Authority (CA). (A default self-signed certificate is installed during product installation.) You can generate a known CA Security Certificate to avoid this situation. See Generating and Importing a Trusted Web Server Certificate and HTTP Redirection for details.
Use HTTPS per action
To send a redirected page via HTTPS, select Use Encrypted protocol (HTTPS) in the HTTP action definition. To send it via the non-encrypted HTTP protocol, clear the checkbox.
Use HTTPS for all actions
Redirected traffic includes information sent to network users via the HTTP actions, as well as authentication credentials sent back to the Appliance. For example, when you use the HTTP Login action, authentication credentials are sent back to the Appliance using the method that you defined.
See Globally Redirect via HTTPS for details. If you configure the to work globally with HTTPS but defined specific actions to be HTTP, redirected traffic is transmitted only via HTTPS.
Captive portal detection exceptions
You can allow endpoints running Mac OS/iOS or Android to remain connected to the Internet without being automatically redirected by HTTP actions due to Apple or Android captive portal detection.
When endpoints connect to the network, the endpoint sends periodic requests to determine whether a captive portal is present. The motivation for this is that when using an application other than a web browser (for example, email), endpoint users may not be presented with the portal page and will fail to connect to the Internet. If the periodic request is redirected, the system recognizes that a captive portal is present.
If you want endpoints to not be periodically redirected by HTTP actions to a web page that requires user interaction, you can enable the Do not redirect captive portal detections option.
This configuration is applied to individual HTTP actions, in the Exceptions tab of each HTTP action.
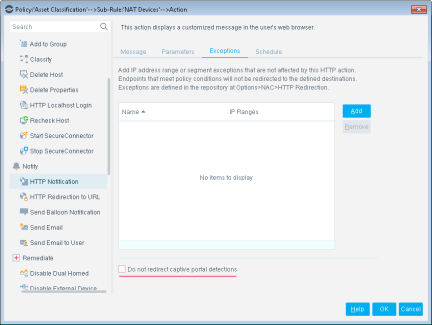
This feature supports Apple WISPr and Android captive portal detections and is relevant for the following HTTP actions:
 HTTP Redirection to URL
 HTTP Login
 HTTP Notification
 HTTP Localhost Login
 Start SecureConnector
 Windows Self Remediation
Action thresholds
An action threshold is the maximum percentage of endpoints that can be controlled by a specific action type defined at a single Appliance.
In some scenarios, policy enforcement requires blocking or restricting network devices and users.
Action thresholds are designed to automatically implement safeguards when rolling out such sanctions across your network. Consider a situation in which you defined multiple policies that utilize a blocking action, for example, the Virtual Firewall or Switch Block actions. In a situation where an extensive number of endpoints match these policies, you may block more endpoints than you anticipated.
An action threshold is the maximum percentage of endpoints that can be controlled by a specific action type defined at a single Appliance. By working with thresholds, you gain more control over how many endpoints are simultaneously restricted in one way or another. See Working with Action Thresholds for details.
 minute read